SAP Single Sign-On (SSO) – free of charge
Introduction
In an SAP system landscape, sooner or later the desire for a single sign-on logon arises because the number of systems is significantly high due to a two- or three-system landscape.
In addition, the use of single sign-on increases security because the use of passwords can be restricted.
SAP offers SAP Single Sign-On(SAP Product Overview V3), a product for which a fee is charged. This makes it possible to implement very complex scenarios in a company, such as SSO using X.509 certificates or Security Assertion Markup Languag (SAML).
However, for many companies this is not necessary, too time-consuming and too cost-intensive. SAP originally provided a Secure Network Communication (SNC) adapter for the ABAP systems, which could then be used to implement Single Sign-On. This led to SAP Single Sign-On 2.0, the first paid product at SAP.
Since the underlying technology is based on the Generic Security Service Application Program Interface(GSS-API) and Kerberos(Link), the original SAP SSO solution can also be used with restrictions, at least for ABAP.
The limitations are:
- no Secure Network Communication for RFCs
- no SSO for SAP ABAP WebGui
- no support from SAP
Those who are not hindered by these limitations can use the following instructions to configure single sign-on. For those who want to set up single sign-on for web applications, check out my article SAP Single Sign-On (SSO) for free with certificates.
The tutorial assumes the following scenario: The users are managed by a Windows Active Directory in the company. The users’ clients are Windows PCs (tested up to Windows 10) and the SAP application server runs on a Linux server.
SAP ABAP SSO
SAP Single Sign-On is based on the Secure Communication Network (SNC). This enables an encrypted connection between clients such as SAP Logon and the SAP ABAP server. SNC offers SAP free of charge to all customers using sapcryptolib. Even if you do not want to use single sign-on, connections within a corporate network should also be encrypted for security reasons.
First, however, a special user account with a Service Principal Name (SPN) is required.
Create AD Service Account
In principle, you can set a service principal name to a user account or to a host account. I recommend the user account, as it can go along with an application. This means that if an application is moved from one host to another, then the user account can be more easily reused.
To create this user you need administration rights for Active Directory.
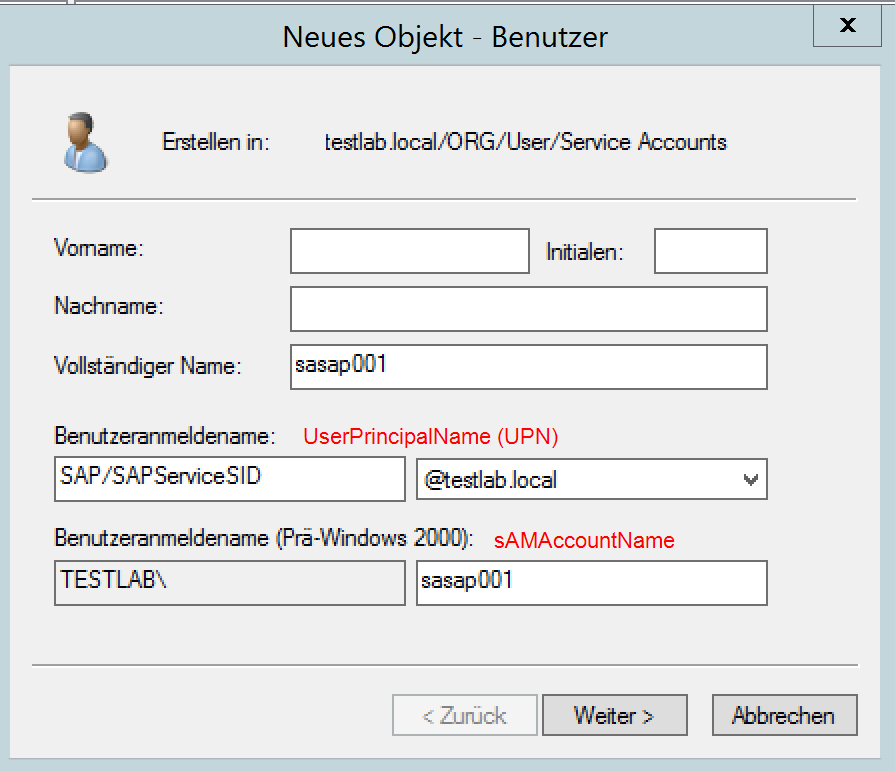
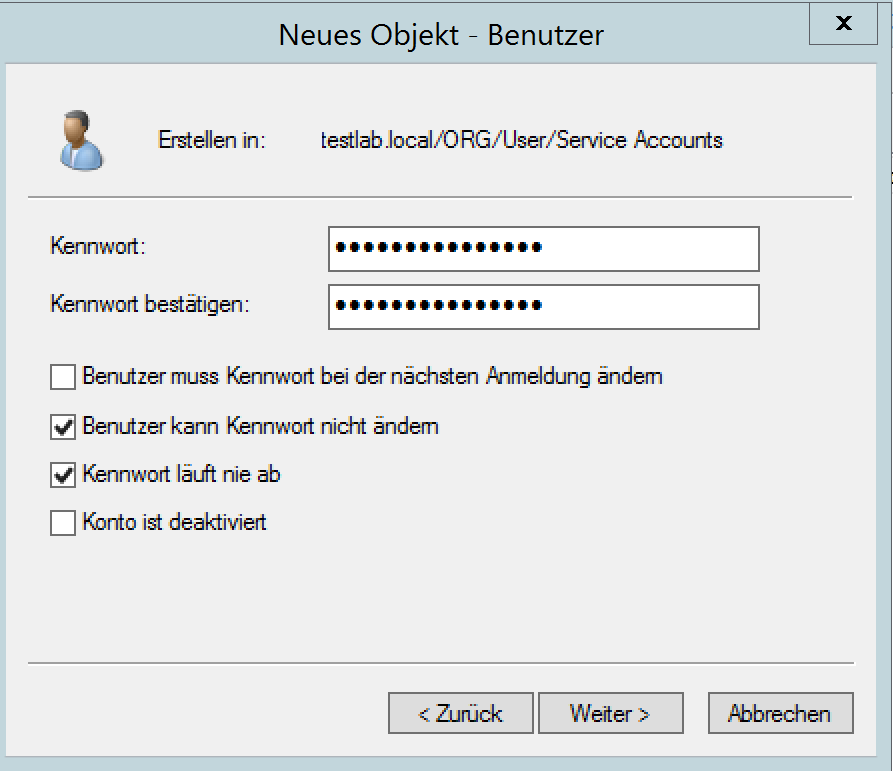
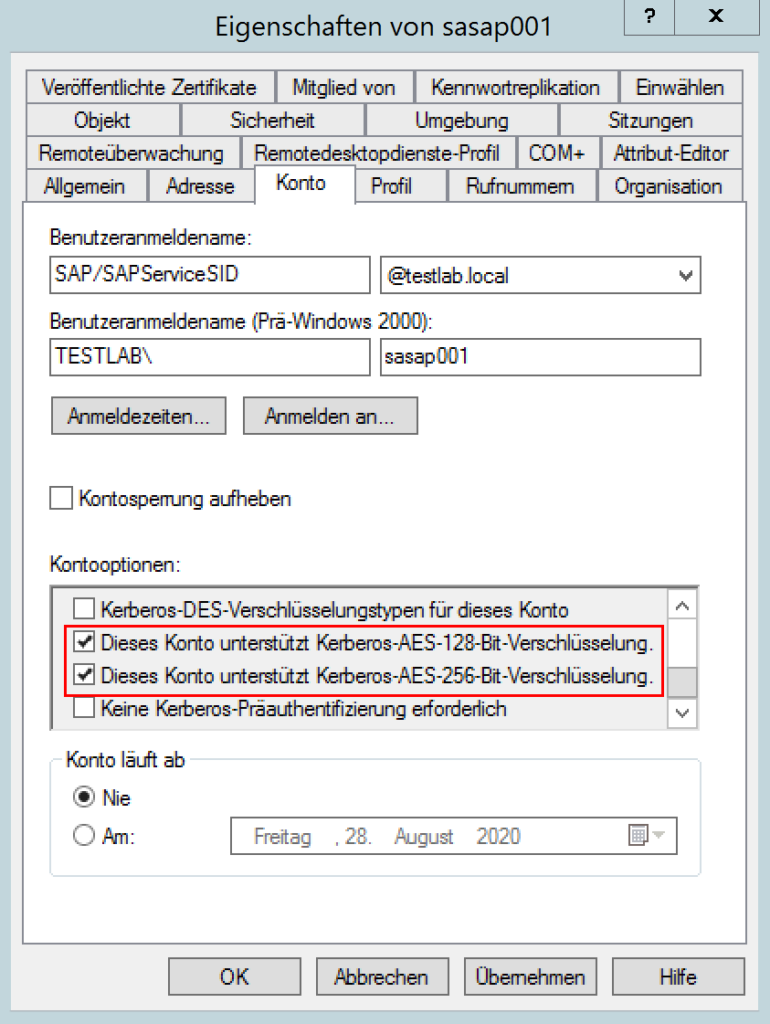
The user should have certain properties enabled in the process:
- the UserPrincipalName must have the same name as the ServicePrincipalName
- the password should never expire
- AES should be enabled
For the ServicePrincipalName, it has proven useful to name it according to the SAP/SAPService
User facility:
The SPN could now be set via the attribute editor. However, this does not work in direct interaction with Linux. If the Kerberos configuration comes from within the application, as with SAP Java or natively with the HANA application, then the SPN can be set directly. I explain this below.
In this case, the SPN is created using the ktpass command line tool.
NOTE: With a computer account, you can’t easily see the AES support. Especially with older accounts there is also the “danger” that they do not have AES enabled. The AES support can be edited via the tool ADSIEdit and the attribute msDS-SupportedEncryptionTypes . The value here should be set to 24 (decimal), then only AES is supported. Further information can be found in the links in the appendix.
Create Kerberos Keytab
In the following the Windows user sasap001(Service AccountSAP) is assigned the ServicePrincipalName SAP/SAPServiceSID (SID should of course be replaced by the correct SAP SID 😉 ). At the same time, a file, the keytab, is created that must be transferred to the target system. This file contains all supported cryptographic keys for user sasap001.
Again, AD administration rights are required to execute this command.
Assign SPN to a user and create a keytab:
ktpass -mapuser sasap001 -princ SAP/
-mapop add -crypto ALL -ptype KRB5_NT_SRV_INST +answer +setupn
-pass rndpass -out %TEMP%\sasap001.keytab
The most important parameter of the command is ptype. KRB5_NT_PRINCIPAL is used by default. But it does not work in this case and is the reason why you should create the service user (only) for SAP ABAP with ktpass.
The -crypto parameter in this example is ALL. This will write all supported cryptographic keys in the output file. Even the unsafe ones. If you want to create only one dedicated entry, you can specify it directly: {DES-CBC-CRC|DES-CBC-MD5|RC4-HMAC-NT|AES256-SHA1|AES128-SHA1} e.g. -crypto AES256-SHA1. If you want to create a keytab with dedicated entries at Windows level, you can also use the -in parameter to specify a keytab from which a dedicated entry is read and processed. In addition to the parameters listed above.

The warning that pType and account type do not match can be ignored.
What should be noted, the Key Version Number (kvno) plays an important role in AES. If this parameter was ignored by Windows for many years, the KVNO is now incremented with every password change and thus a keytab entry with an incorrect KVNO is invalid.
Assign SPN to a computer account and create a keytab:
ktpass -mapuser <HOST>$@testlab.local -PRINC SAP/SAPService<SID>@TESTLAB.LOCAL
-crypto ALL -mapop add -ptype KRB5_NT_SRV_HST +answer
-out %TEMP%\<HOST>.keytab –pass rndpass
Regarding the Keytab I would like to pass on the following hint from MIT:
The keytab file is an encrypted, local, on-disk copy of the host’s key. The keytab file, … is a potential point-of-entry for a break-in, and if compromised, would allow unrestricted access to its host. The keytab file should be readable only by root, and should exist only on the machine’s local disk. The file should not be part of any backup of the machine, unless access to the backup data is secured as tightly as access to the machine’s root password itself.
https://web.mit.edu/kerberos/krb5-1.5/krb5-1.5.4/doc/krb5-install/The-Keytab-File.html
Therefore, if this file has been implemented on the target system, it should be deleted on all other systems where it has been temporarily stored.
Linux – Server Kerberos configuration
Further configuration now takes place on the Linux SAP application server. If there are multiple application servers for an SAP system, then this configuration must be performed on all application servers. The same keytab is used in this case.
In order to use Kerberos and provide the necessary tools, the following packages must be installed under SLES:
$ sudo zypper in krb5 krb5-client
The basic configuration then takes place in /etc/krb5.conf. The configuration, adapted to your own domain, should look something like this:
$ sudo vim /etc/krb.conf
[libdefaults]
    dns_canonicalize_hostname = false
    rdns = false
    dns_lookup = false
    dns_lookup_realm = false
    ignore_acceptor_hostname = true
    default_realm = TESTLAB.LOCAL
    # default_ccache_name = FILE:/tmp/krb5cc_%{uid}
    # Stärkere Verschlüsselung
    default_tkt_enctypes = aes
    default_tgs_enctypes = aes
    allow_weak_crypto = false

[domain_realm]
    .testlab.local = adsvr.testlab.local
    testlab.local = adsvr.testlab.local

[realms]
TESTLAB.LOCAL = {
    default_domain = testlab.local
    kdc = adsvr.testlab.local
    admin_server = adsvr.testlab.local
}

[logging]
    kdc = FILE:/var/log/krb5/krb5kdc.log
    admin_server = FILE:/var/log/krb5/kadmind.log
    default = SYSLOG:NOTICE:DAEMON
With this configuration, it should already be possible to request a ticket from a normal AD user.
$ kinit <ad-benutzer>@TESTLAB.LOCAL
Password for <ad-benutzer>@TESTLAB.LOCAL:
$
If this works, then the goal is to get tickets automated without password entry. For this we need the previously created keytab. This can be transferred to the Linux server using WinSCP, for example.
The default path for the keytab is /etc/krb5.keytab. However, it could also be under a custom path.
modify keytab entries
If the keytab, as described above, was created with ktpass … -crypto ALL, then the keytab also contains not so secure cryptographic entries. In principle, the, with the krb.conf listed above, are not allowed. But you can also remove these entries. So that you can see the entries with the properties, call klist:
$ klist -k krb5.keytab -etK
$ ktutil
rkt krb5.keytab
list
delent 1
delent 1
delent 1
wkt krb5_mod.keytab
q
$
Finally, move the keytab to the right place and secure it.
$ sudo mv krb5_mod.keytab /etc/krb5.keytab
$ sudo chown root:sapsys /etc/krb5.keytab
$ sudo chmod 640 /etc/krb5.keytab
With this configuration it should now be possible to create an automatic ticket. The further configuration now takes place as <sid >adm.
Create a test ticket and check it:
<sid>adm $ /usr/bin/kinit -V -k -t /etc/krb5.keytab SAP/SAPService<SID>@TESTLAB.LOCAL
Using existing cache: :/run/user/1042/krb5cc/tktUJfFjB
Using principal: SAP/
Using keytab: /etc/krb5.keytab
Authenticated to Kerberos v5
<sid>adm $ klist -e
Ticket cache: DIR::/run/user/1042/krb5cc/tktUJfFjB
Default principal: SAP/
Valid starting Expires Service principal
08/09/20 18:14:05 08/10/20 04:14:05 krbtgt/
renew until 08/10/20 18:14:05, Etype (skey, tkt): aes256-cts-hmac-sha1-96, aes256-cts-hmac-sha1-96
<sid>adm $
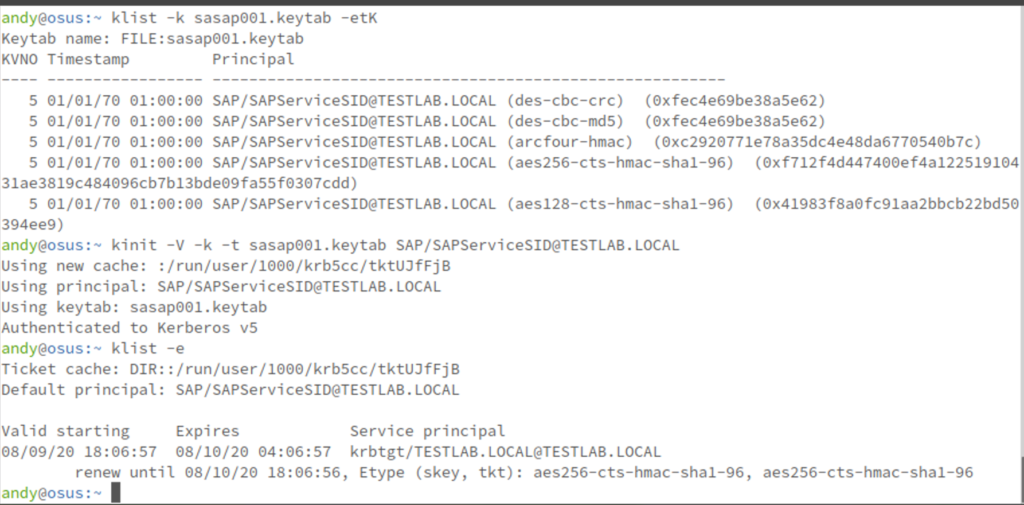
If everything has worked out, there is nothing standing in the way of SAP Single Sign-On. A crontab entry is created so that the tickets are renewed regularly.
<sid>adm $ crontab -e
15 0-23/8 * * * /usr/bin/kinit -k -t /etc/krb5.keytab SAP/SAPService<SID>@TESTLAB.LOCAL
Troubleshooting
If you have gone through the previous steps in this way, you can narrow down the errors relatively well. In order to obtain additional information during ticket generation, you can
$ KRB5_TRACE=/dev/stderr kinit -k -t /etc/krb5.keytab SAP/SAPService<SID>@TESTLAB.LOCAL
It is also important that the time difference between the AD server, the Linux SAP application server or even the client does not exceed 5 minutes. This is the default time of Kerberos that is still tolerated. This should not be a problem, but has led to errors with misconfigured time servers.
Configure SAP application server
The configuration for SAP Single Sign-On is controlled in the application server via various parameters. The parameters can be stored in DEFAULT.PFL. A minimal configuration could look like the following:
snc/accept_insecure_gui             1
snc/accept_insecure_r3int           1
snc/accept_insecure_cpic            1
snc/accept_insecure_rfc             1
snc/extid_login_diag                1
snc/permit_insecure_start           1
snc/identity/as                     p:SAP/SAPService<SID>@TESTLAB.LOCAL
snc/gssapi_lib                      /usr/lib64/libgssapi_krb5.so
snc/enable                          1
The configuration becomes active after a restart of the SAP system. If the dev_disp process does not start, a dev_w<n> work process should be checked for SNC errors. If in doubt, set the snc/enable parameter back to 0 and restart the system.
Configure Windows Client PC
Finally, configure the client. To do this, note 2115486 must be unlocked and then the files win32sso.zip or win64sso.zip must be downloaded. In them the latest version is included. Usually the 32bit version is sufficient.
These files must then be copied to C:\windows\SYSWOW64 and system variables set.
c:\setx SNC_LIB C:\windows\SYSWOW64\gsskrb5.dll
The last step is to configure the SAP Logon. Depending on how the systems are addressed, via the message server or the dialog instance directly, the SNC name is taken directly from the system at the message server. It must be entered manually for the dialog instance.
Configure SAP Logon
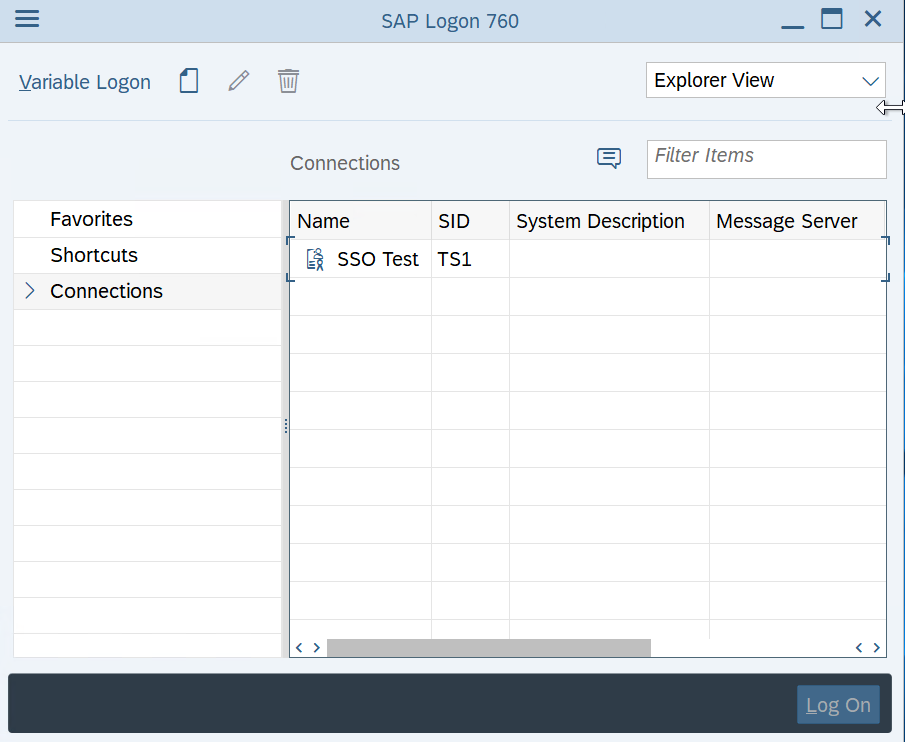
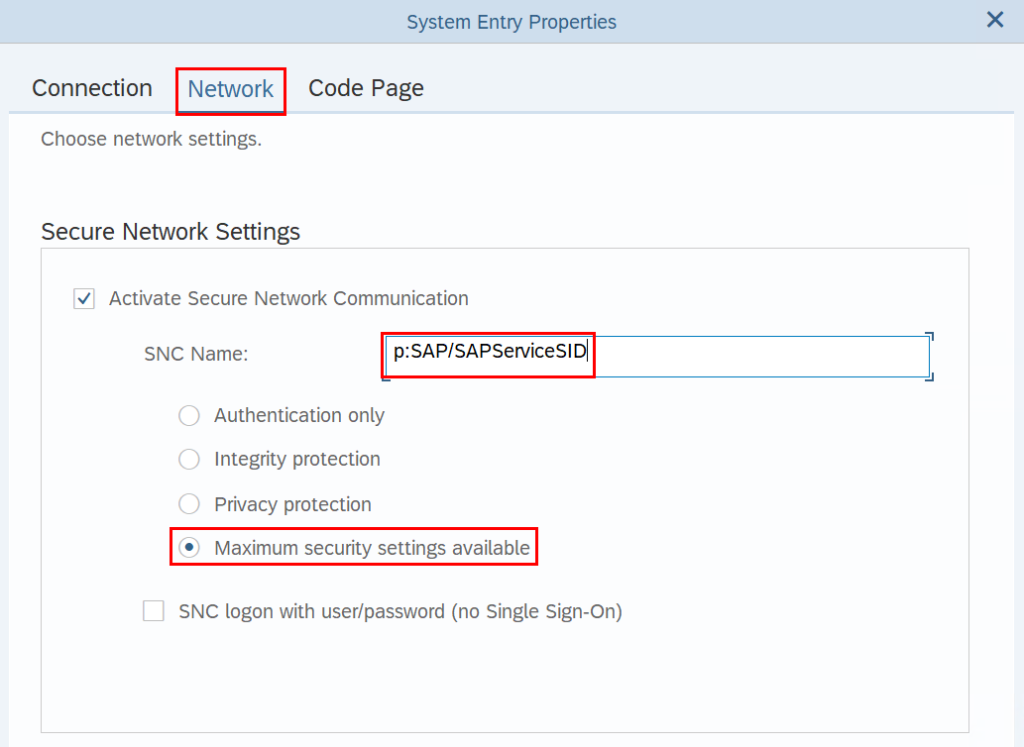
Enter the SNC name here as specified in the snc/identity/as parameter. Here you can, but do not have to, enter the domain name in capital letters, SAP/.
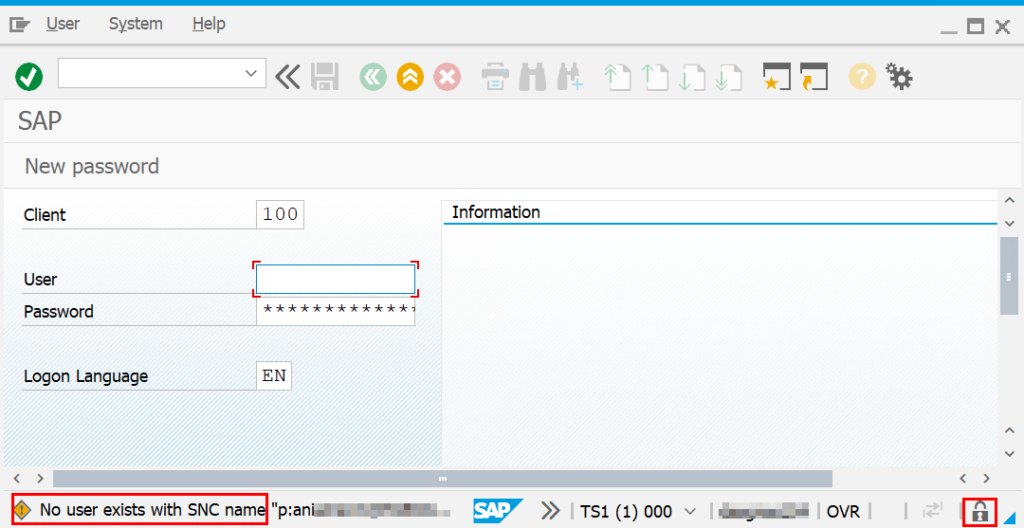
Encrypted communication can also be achieved free of charge using standard SAP tools. The last step is the SAP user configuration to complete SAP Single Sign-On.

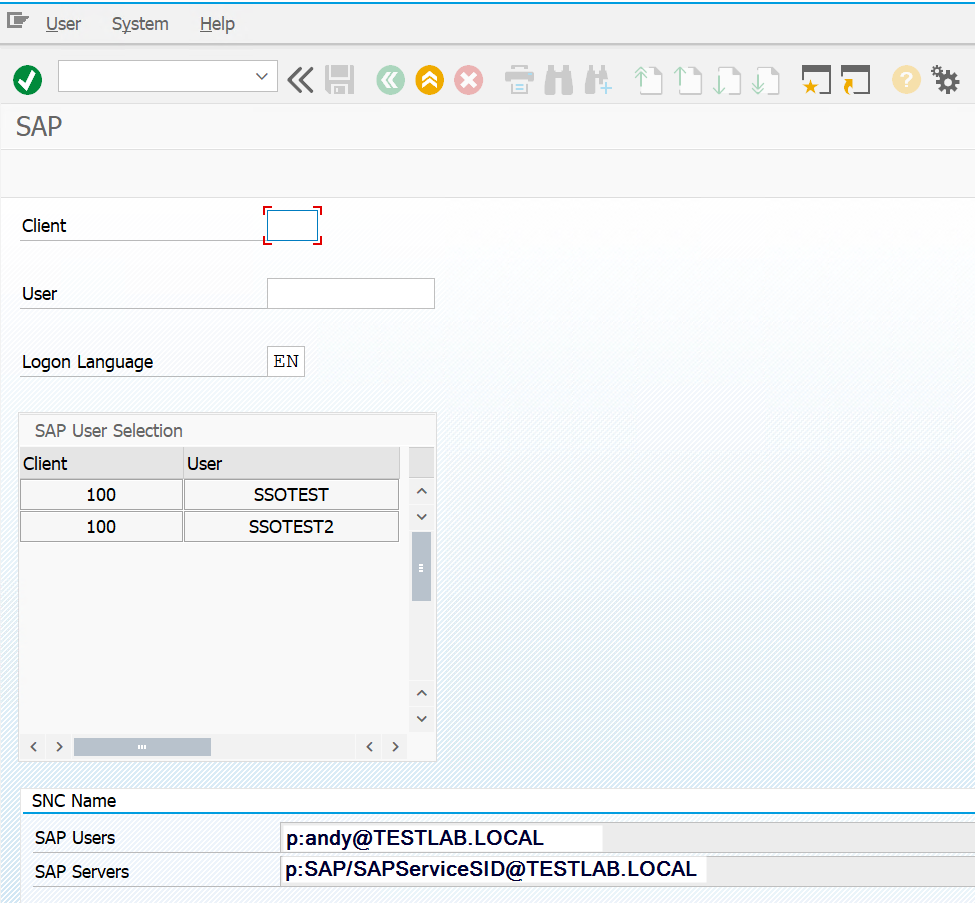
The SNC name is the Windows login name with the prefix p:. It is sufficient to enter the login name, but it is also possible to enter the domain name – p: – which must then be entered in capital letters.
Now you have to decide if the user will be a pure single sign-on user and if the password should be deactivated.
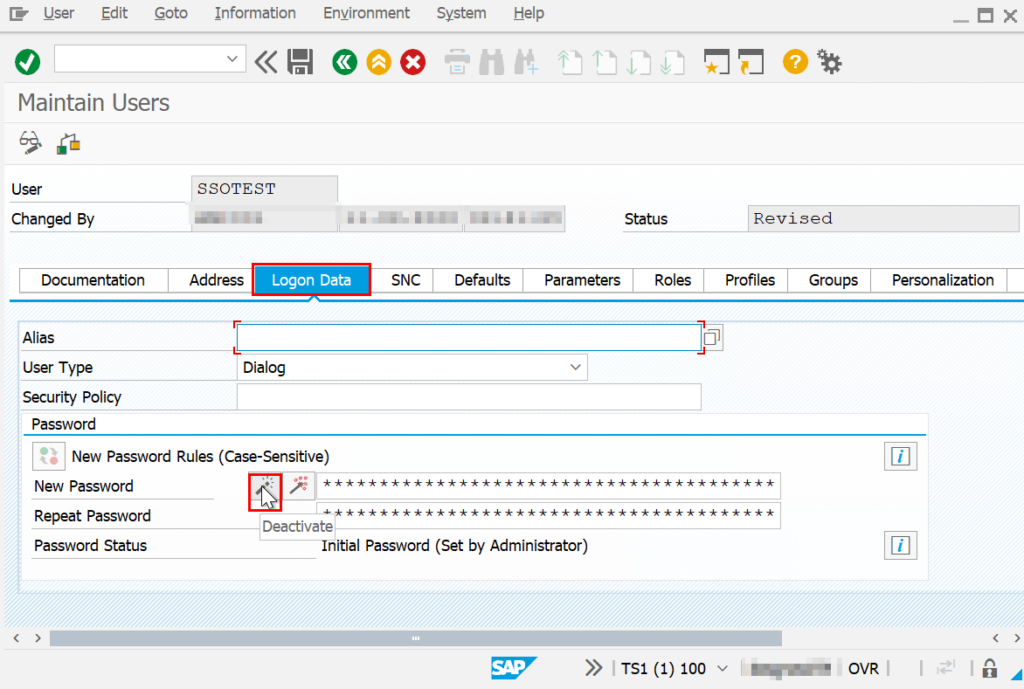
Once all this is done, nothing stands in the way of single sign-on access. If the Windows user is assigned to several SAP users in different clients or in the same client, a selection list for client and SAP user appears when logging on. Otherwise, the registration will be carried out directly.
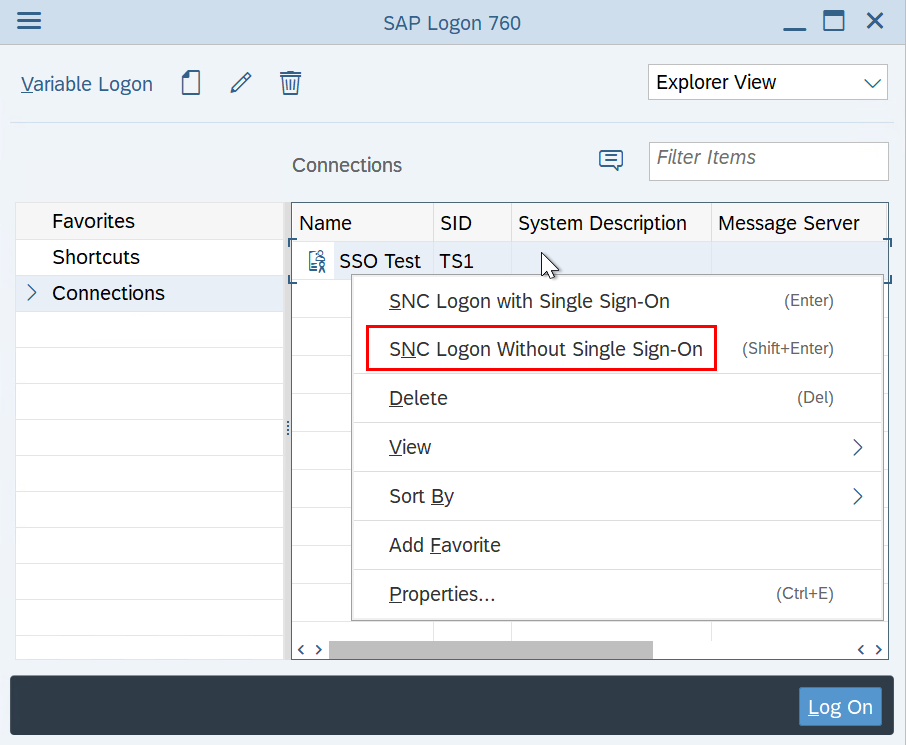
Users who still want to log on by password can still do so via the context menu of the SAP Logon.
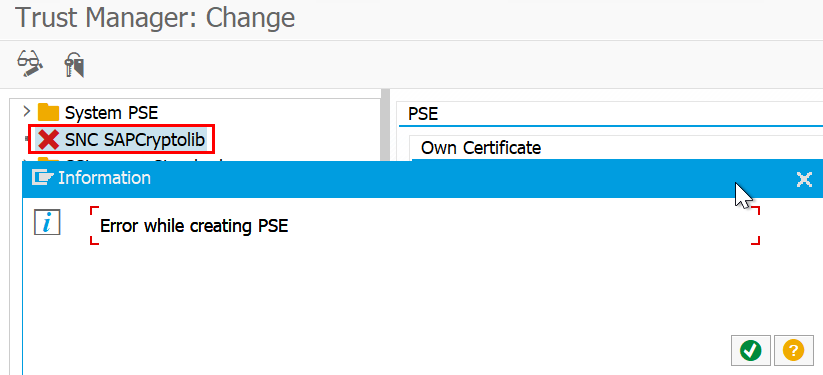
As already mentioned, one downer is the lack of RFC encryption. By setting the snc/gssapi_lib parameter, the SNC SAPCryptolib for RFC connections can no longer be generated.
Another shortcoming of this solution is the lack of support for the web services, e.g. the WebGui. However, if necessary, you can create a solution using SAML and a central identity provider or set up the solution in my article SAP Single Sign-On (SSO) free of charge with certificates. This means that, for example, SAP Java systems can also be set up with SSO.
-----------------------------------------------
Related links
SAP Explanatory Notes on the Usage of GSS API Version 2 for SNC: https://ftp.gwdg.de/pub/misc/sapdb/icc/bc-snc40/SAP_Explanatory_Notes_on_the_Usage_of_GSS_API_Version_2_for_Secure_Network_Communications.pdf
SAP Note: 2115486 – GSSKRB5.DLL & GSSNTLM.DLL Download
SAP Note: 2025528 – (Limited Support for) more than one concurrent SNC_LIB
SAP Note: 1898778 – How to mass update the SNC Name/Canonical Name of a user
Microsoft documentation ktpass: https://docs.microsoft.com/de-de/windows-server/administration/windows-commands/ktpass
Microsoft Documentation Service Principal Name: https://docs.microsoft.com/en-us/windows/win32/ad/service-principal-names
Decrypting the Selection of Supported Kerberos Encryption Types: https://techcommunity.microsoft.com/t5/core-infrastructure-and-security/decrypting-the-selection-of-supported-kerberos-encryption-types/ba-p/1628797
msDS-SupportedEncryptionTypes – Computer accounts: https://docs.microsoft.com/de-de/archive/blogs/openspecification/msds-supportedencryptiontypes-episode-1-computer-accounts
Active Directory: Using Kerberos Keytabs to integrate non-Windows systems: https://social.technet.microsoft.com/wiki/contents/articles/36470.active-directory-using-kerberos-keytabs-to-integrate-non-windows-systems.aspx
Adrian Devecz
26.06.2024
Wow! Simply wow! Seriously, it was a refreshing read to go through your description. There were no misleading parts, the codes weren’t jumbled up, filled with typos, and no crucial information was left out that would make it not work. I swear, I can’t believe I read something related to SAP. Thank you! You’ve really helped a lot.